
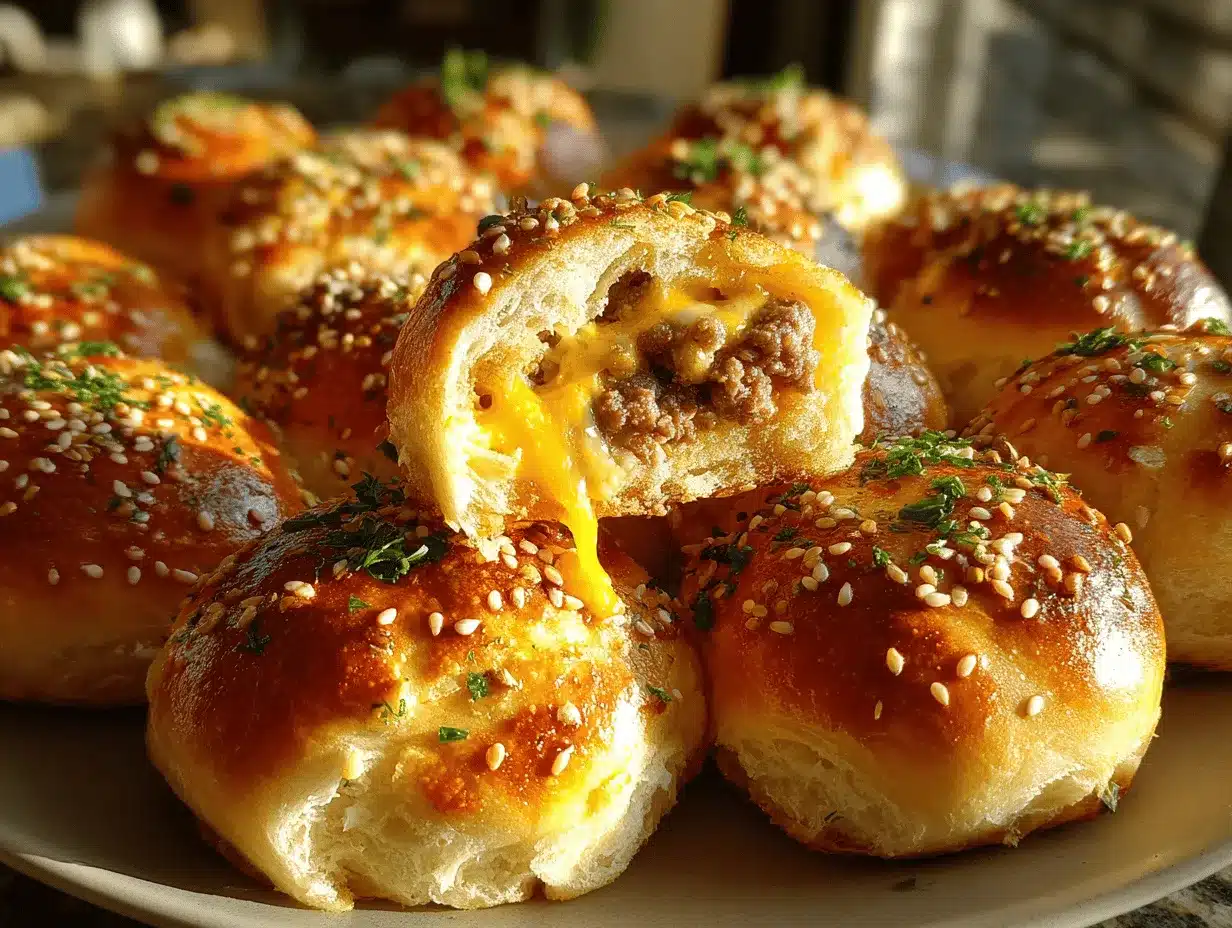
The first time I bit into a garlic parmesan cheeseburger bomb, I knew dinner would never be the same. Imagine buttery, golden biscuit dough wrapped around juicy beef, gooey cheese, and that unmistakable pop of garlic and parmesan. It’s comfort food with a twist—crispy, cheesy, and honestly, just a little bit addictive. The kitchen smelled like a dream, and my family was already hovering before I even had the tray out of the oven.
I stumbled onto this recipe by accident (you know how dinner experiments go!). We’d run out of burger buns, but had a can of biscuit dough and a block of parmesan left from pizza night. Some garlic powder, a handful of shredded cheese, and a little ground beef became something way more fun than the usual burgers. Now, these garlic parmesan cheeseburger bombs are our go-to for busy weeknights, game days, and when everyone’s hungry for something a bit special but not fussy.
You’ll love how easy this recipe is—30 minutes, minimal prep, and you don’t need any fancy equipment. The flavor is crave-worthy, and you can switch up the fillings to suit picky eaters or sneak in extra veggies. As someone who’s tested these at least a dozen times (and had plenty of “oops” moments), I can say with total confidence: this is one family dinner you’ll want to make again and again. Whether you’re feeding teens, toddlers, or just your own burger cravings, garlic parmesan cheeseburger bombs are a total win.
Why You’ll Love This Recipe
- Quick & Easy: Ready in just 30 minutes. Perfect for busy nights, last-minute gatherings, or when you forgot to plan dinner!
- Simple Ingredients: No crazy shopping lists here—just pantry staples, fridge basics, and a few flavor boosters like garlic and parmesan.
- Perfect for Family Dinners: These bombs are great for sharing, so pile them on a platter and watch them disappear. Bonus: no forks needed!
- Crowd-Pleaser: Kids love the gooey center, adults love the garlicky kick, and honestly, even picky eaters usually come back for seconds.
- Unbelievably Delicious: That crispy biscuit edge, melty cheese, and juicy beef make every bite a little explosion of flavor.
What sets this garlic parmesan cheeseburger bombs recipe apart? For starters, blending parmesan right into the biscuit dough gives it a savory depth you don’t get with regular cheeseburger pockets. Garlic powder and real minced garlic (if you dare!) add a punch that’s totally irresistible. I use a mix of cheddar and mozzarella for the filling—it gives you meltiness and a bit of stretch. And here’s my favorite tip: brushing the tops with melted butter plus a sprinkle of extra parmesan before baking creates that golden, bakery-style finish.
This isn’t just another cheeseburger knockoff. It’s comfort food made easy, baked instead of fried, and packed with flavor without the mess. My family asks for these on repeat, and I’ve brought them to potlucks, sleepovers, and even brunch (they work, trust me). If you want to make dinner fun, get everyone involved, or just impress your crew without stressing, garlic parmesan cheeseburger bombs are the answer. The best part? They taste just as good reheated the next day—if you have any left!
Ingredients Needed
This recipe uses simple, familiar ingredients to deliver bold flavor and that satisfying, cheesy bite. Most of what you need you probably have already. Here’s the breakdown:
- For the cheeseburger bombs:
- 1 lb (450 g) ground beef (80/20 for juiciness; substitute ground turkey or chicken if you prefer)
- 1/2 cup (50 g) chopped onion (adds sweetness; use red onion for a mild twist)
- 1 tsp garlic powder (essential for that signature kick)
- 1/2 tsp salt (plus more to taste)
- 1/2 tsp black pepper
- 1 cup (100 g) shredded cheddar cheese (or mozzarella for extra stretch)
- 1/2 cup (45 g) grated parmesan cheese (fresh is best—trust me, it’s worth it!)
- 1 can (16 oz/450 g) refrigerated biscuit dough (8 biscuits; Pillsbury works well, or use store brand)
- 2 tbsp butter, melted (for brushing tops)
- Optional: 2 tbsp chopped pickles or jalapeños (for a tangy/spicy hit)
- For the garlic parmesan topping:
- 1/4 cup (25 g) grated parmesan cheese
- 1 tsp garlic powder
- 1 tbsp fresh parsley, chopped (for color and flavor; dried works in a pinch)
Ingredient tips: I love using Cabot cheddar for its creamy melt, and the small-can refrigerated biscuits hold up best without getting soggy. If you’re gluten-free, swap the biscuit dough for gluten-free pizza dough. No beef? Ground turkey is great, just season well. Vegan cheese shreds can work if you’re dairy-free, though the melt is different. For a lower-carb option, try rolling in fathead dough (almond flour, mozzarella, cream cheese).
If you want to mix things up, toss in a handful of cooked bacon bits or swap the cheddar for pepper jack. The cheese and beef combo is classic, but you can absolutely sneak in finely chopped mushrooms or spinach for extra nutrition (my kids never notice!).
Equipment Needed
- Baking sheet (lined with parchment for easy cleanup; a silicone mat works too)
- Large skillet (for browning the beef; nonstick or cast iron both do the job)
- Mixing bowls (one for filling, one for topping mix)
- Pastry brush (for buttering tops; a spoon will work if you don’t have one)
- Measuring cups and spoons (accuracy matters for cheese and seasonings)
- Knife and cutting board (for onions, parsley, and any add-ins)
- Oven mitts (these bombs get hot—don’t forget!)
If you don’t have a skillet, you can brown the meat in a saucepan. I’ve tried with both parchment and silicone mats—parchment is easier for cleanup, but the mat gives the bottoms an extra-crisp edge. Pastry brush is ideal, but I’ve used the back of a spoon in a pinch. If you bake often, invest in a sturdy rimmed sheet pan; mine’s lasted years and still bakes evenly. For budget-friendly options, store-brand baking sheets work, just check for warping over time.
Keep your tools clean—especially the pastry brush. Butter gets sticky fast, so wash it out right after use. If you want to cut down on dishes, mix your filling in the same bowl you prepped the onions in. Less mess, more fun!
Preparation Method
-
Preheat your oven to 375°F (190°C).
Line a baking sheet with parchment paper or a silicone baking mat. This keeps cleanup easy and helps prevent sticking. -
Brown the beef:
Heat your skillet over medium-high. Add the ground beef and chopped onion, breaking up the meat with a spatula. Cook for 5-7 minutes, until the beef is browned and onions are softened. Drain off any excess fat.
Tip: Don’t rush—let the beef get a little crispy around the edges for extra flavor. -
Add seasonings:
Sprinkle in garlic powder, salt, and pepper. Stir well to combine. Remove from heat and let cool for 2-3 minutes. This keeps the cheese from melting too soon.
Troubleshooting: If the beef mixture seems dry, add a teaspoon of ketchup or mustard. -
Mix in cheese:
Add shredded cheddar and 1/2 cup parmesan to the cooled beef mixture. Toss gently until evenly coated.
Note: If you’re adding pickles or jalapeños, stir them in now. -
Prep the biscuit dough:
Separate the biscuits and flatten each into a 4-inch (10 cm) circle using your hands or a rolling pin. They don’t have to be perfect—just big enough to hold the filling.
Warning: Don’t roll too thin, or you’ll get leaks! -
Fill and shape:
Spoon about 2 tablespoons (30 g) of beef mixture into the center of each biscuit. Pull the edges up and pinch closed, sealing tightly. Place seam-side down on your prepared baking sheet.
Efficiency tip: Keep a damp towel nearby to wipe sticky fingers between bombs. -
Make the garlic parmesan topping:
Mix 1/4 cup parmesan, 1 tsp garlic powder, and chopped parsley in a small bowl. Brush each bomb with melted butter, then sprinkle generously with topping mix.
Sensory cue: The tops should glisten and smell garlicky even before baking! -
Bake:
Pop the sheet into your preheated oven. Bake for 15-18 minutes, until golden brown and puffed. The cheese may bubble a little—this is good!
Check: The bottoms should be crisp, not doughy. If needed, add 2 more minutes. -
Cool slightly and serve:
Let the bombs rest for 5 minutes before serving (the filling will be hot!). Use a spatula to transfer to a platter.
Personal tip: I always sneak one for “taste testing” while they cool. It’s tradition in our house!
If you run into splitting dough, try pinching harder or patching with a bit of extra dough. If the cheese leaks, don’t stress—it makes a delicious crispy edge.
Cooking Tips & Techniques
Honestly, these garlic parmesan cheeseburger bombs are pretty forgiving. But after a few kitchen disasters, I’ve learned some tricks for getting them just right.
- Chill the filling: If you’re not in a rush, pop the beef-cheese mix in the fridge for 10 minutes. It firms up, making bombs easier to fill and seal.
- Don’t overstuff: It’s tempting to pack in more filling, but too much leads to bursting bombs and cheese leaks. Stick to about 2 tablespoons per biscuit.
- Seal well: Pinch the seams with wet fingers or twist gently like a dumpling. If the dough feels sticky, dust your hands with flour.
- Bake on the middle rack: This helps the tops brown evenly and avoids soggy bottoms.
- Multitasking tip: While the beef cooks, prep your biscuit dough and topping mix. You’ll save at least 5 minutes.
- Troubleshooting: If your bombs look pale after 15 minutes, brush with a little more butter and put under the broiler for 1-2 minutes (watch closely!).
- Consistency matters: Use freshly grated parmesan if you can—it melts better and tastes richer. Pre-shredded cheese works, but sometimes makes the filling a bit greasy.
I’ve had bombs split, filling spill, and cheese burn on top. It happens. But honestly, even the “ugly” ones taste awesome. The key is sealing the dough well and not rushing the bake. If you want uniform size, weigh the filling and dough balls (I don’t bother, but some folks love precision). And if you’re prepping for a crowd, make ahead and freeze—just reheat in the oven for best results.
Variations & Adaptations
One of the coolest things about garlic parmesan cheeseburger bombs is how easy it is to switch things up. Here are some of my favorite twists:
- Low-carb: Use fathead dough (almond flour, mozzarella, cream cheese, egg) instead of biscuits. It’s rich and satisfying—perfect for keto eaters.
- Veggie-packed: Swap half the beef for finely chopped mushrooms, spinach, or zucchini. Cook them down before mixing with cheese. My kids never notice, and it adds a subtle earthiness.
- Spicy: Add diced jalapeños, pepper jack cheese, or a sprinkle of red pepper flakes to the filling. For real heat lovers, serve with sriracha or chipotle mayo.
- Gluten-free: Use gluten-free biscuit dough or pizza dough from brands like Schär or Bob’s Red Mill.
- Dairy-free: Opt for vegan cheese shreds and dairy-free butter. The flavor is different, but still delicious.
- Bake vs. Air Fryer: Air frying gives an extra crisp edge—cook at 350°F (175°C) for 12-15 minutes, checking halfway through.
Personally, I love sneaking in caramelized onions and a little smoked gouda for grown-up flavor. If you want a breakfast bomb, use scrambled eggs, cooked sausage, and cheddar—my teens request that version on weekends. Don’t be afraid to make this recipe your own; everyone’s got a cheeseburger “secret ingredient!”
Serving & Storage Suggestions
Garlic parmesan cheeseburger bombs are best served hot, straight from the oven. The cheese is gooey, the tops are golden, and the aroma is pure comfort. Pile them onto a big platter, sprinkle with extra parsley or parmesan, and let everyone dig in with their hands.
- Serving temperature: Hot is best, but warm is good too. If you want a dipping sauce, ranch, ketchup, or garlic aioli work wonders.
- Pairings: Serve with a crisp green salad, sweet potato fries, or roasted veggies. For drinks, iced tea, lemonade, or a cold beer match perfectly.
- Storage: Cool bombs completely, then store in an airtight container in the fridge for up to 3 days.
- Freezing: Freeze individually wrapped bombs for up to 2 months. Reheat in a 350°F (175°C) oven for 8-10 minutes (microwave works in a pinch, but the texture won’t be as crisp).
- Flavor notes: The garlic and parmesan deepen overnight, so leftovers taste even richer. If you love bold flavor, let them chill and reheat the next day.
If you’re prepping for a party, make the bombs ahead and bake just before serving. They stay warm on a tray for about 20 minutes, so you’ve got time to mingle (or sneak a second helping!).
Nutritional Information & Benefits
Each garlic parmesan cheeseburger bomb comes in at about 220 calories, with 12g protein, 15g carbs, and 12g fat (depending on your dough and cheese choices). They’re a good source of calcium from the cheese and protein from the beef. If you use lean beef and pile in veggies, you’ll bump up the nutrition even more.
Key benefits: High protein for staying power, calcium for bones, and a dose of iron from the beef. If you go gluten-free or dairy-free, adjust accordingly. Allergens to note: wheat (from biscuit dough), dairy (cheese and butter), and eggs (in some doughs). For low-carb needs, swap the dough and keep the filling classic.
Personally, I love how satisfying these are without being heavy. If you’re watching sodium, reduce the added salt and use no-salt cheese. It’s easy to adapt, and still totally delicious.
Conclusion
If you’re searching for a dinner that’s easy, fun, and guaranteed to become a family favorite, garlic parmesan cheeseburger bombs are your answer. They pack classic cheeseburger flavor into a handheld bite, with a garlicky, cheesy twist that makes every meal feel special—without any fuss. Customize the fillings, play with the toppings, and make them your own.
This recipe has brought so many smiles to our table, from busy weeknights to lazy weekends. I love how everyone gets excited when they see these come out of the oven (and honestly, I look forward to leftovers for lunch!). If you try these bombs, let me know your favorite variations or how you served them. Drop a comment, share with friends, or tag your photos—I love seeing your kitchen adventures!
So go ahead, give garlic parmesan cheeseburger bombs a try. You might just find a new dinner tradition—and maybe a few new kitchen memories too.
FAQs
Can I make garlic parmesan cheeseburger bombs ahead of time?
Yes, you can prep and assemble the bombs up to a day ahead—just cover and refrigerate. Bake when you’re ready to eat for freshest results.
What’s the best cheese for cheeseburger bombs?
Cheddar and mozzarella are both great. For extra flavor, add some parmesan to the filling and on top. You can also try pepper jack or gouda.
How do I keep the bombs from splitting open?
Don’t overfill, and pinch the dough seams tightly. If needed, patch with a small piece of dough. Chilling the filling also helps.
Can I freeze these cheeseburger bombs?
Absolutely! Wrap cooled bombs tightly and freeze for up to 2 months. Reheat in the oven for best texture.
Are garlic parmesan cheeseburger bombs kid-friendly?
Definitely. Kids love the cheesy center and fun shape. You can leave out onions or add extra cheese to suit their tastes.
Pin This Recipe!


Garlic Parmesan Cheeseburger Bombs
- Total Time: 30 minutes
- Yield: 8 cheeseburger bombs 1x
Description
Garlic Parmesan Cheeseburger Bombs are buttery biscuit dough pockets stuffed with juicy beef, gooey cheese, and a punch of garlic and parmesan. This easy, family-friendly dinner is ready in just 30 minutes and is perfect for busy weeknights or game days.
Ingredients
- 1 lb ground beef (80/20 for juiciness)
- 1/2 cup chopped onion
- 1 tsp garlic powder
- 1/2 tsp salt
- 1/2 tsp black pepper
- 1 cup shredded cheddar cheese (or mozzarella)
- 1/2 cup grated parmesan cheese
- 1 can (16 oz) refrigerated biscuit dough (8 biscuits)
- 2 tbsp butter, melted
- Optional: 2 tbsp chopped pickles or jalapeños
- For topping:
- 1/4 cup grated parmesan cheese
- 1 tsp garlic powder
- 1 tbsp fresh parsley, chopped (or 1 tsp dried parsley)
Instructions
- Preheat oven to 375°F (190°C). Line a baking sheet with parchment paper or a silicone baking mat.
- Heat a large skillet over medium-high. Add ground beef and chopped onion, breaking up the meat. Cook for 5-7 minutes until beef is browned and onions are softened. Drain excess fat.
- Sprinkle in garlic powder, salt, and pepper. Stir well to combine. Remove from heat and let cool for 2-3 minutes.
- Add shredded cheddar and 1/2 cup parmesan to the cooled beef mixture. Toss gently until evenly coated. Stir in pickles or jalapeños if using.
- Separate biscuits and flatten each into a 4-inch circle using hands or a rolling pin.
- Spoon about 2 tablespoons of beef mixture into the center of each biscuit. Pull edges up and pinch closed, sealing tightly. Place seam-side down on prepared baking sheet.
- Mix 1/4 cup parmesan, 1 tsp garlic powder, and parsley in a small bowl. Brush each bomb with melted butter, then sprinkle generously with topping mix.
- Bake for 15-18 minutes, until golden brown and puffed. If needed, add 2 more minutes for crisp bottoms.
- Let bombs rest for 5 minutes before serving. Use a spatula to transfer to a platter.
Notes
Chill the beef-cheese filling for easier assembly. Don’t overstuff the bombs to prevent splitting. Seal seams tightly and bake on the middle rack for even browning. For gluten-free or dairy-free adaptations, use appropriate dough and cheese substitutes. Leftovers reheat well and taste even richer the next day.
- Prep Time: 10 minutes
- Cook Time: 18 minutes
- Category: Main Course
- Cuisine: American
Nutrition
- Serving Size: 1 cheeseburger bomb
- Calories: 220
- Sugar: 2
- Sodium: 480
- Fat: 12
- Saturated Fat: 6
- Carbohydrates: 15
- Fiber: 1
- Protein: 12
Keywords: cheeseburger bombs, garlic parmesan, family dinner, easy recipe, biscuit dough, beef, kid-friendly, game day, comfort food