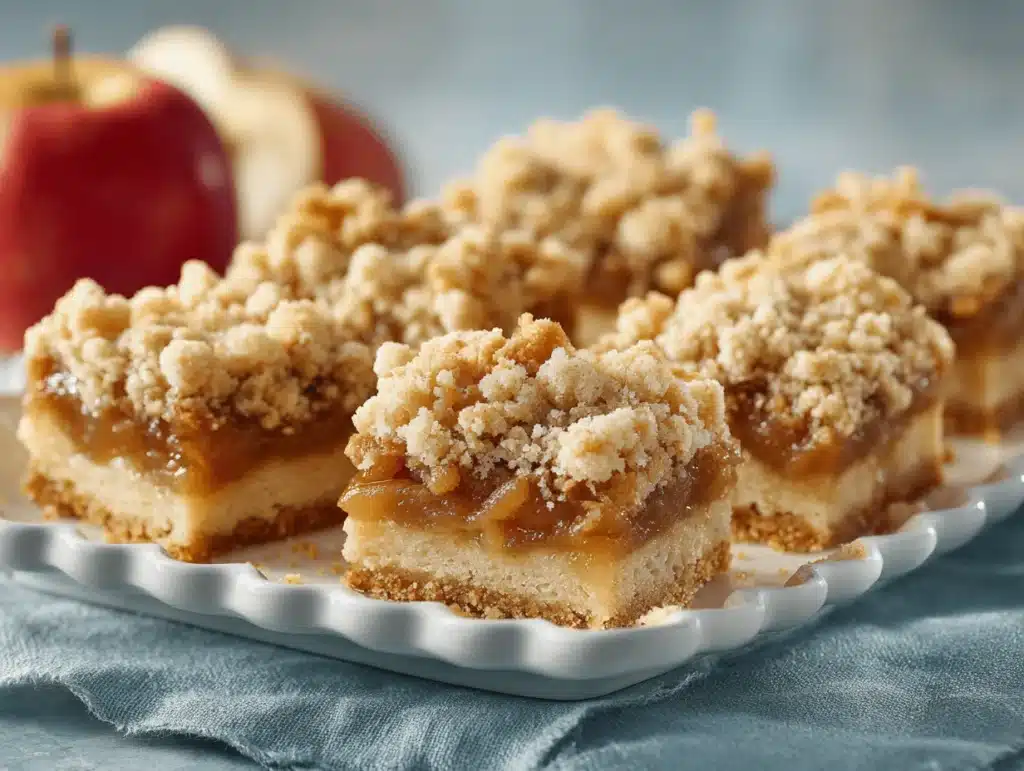
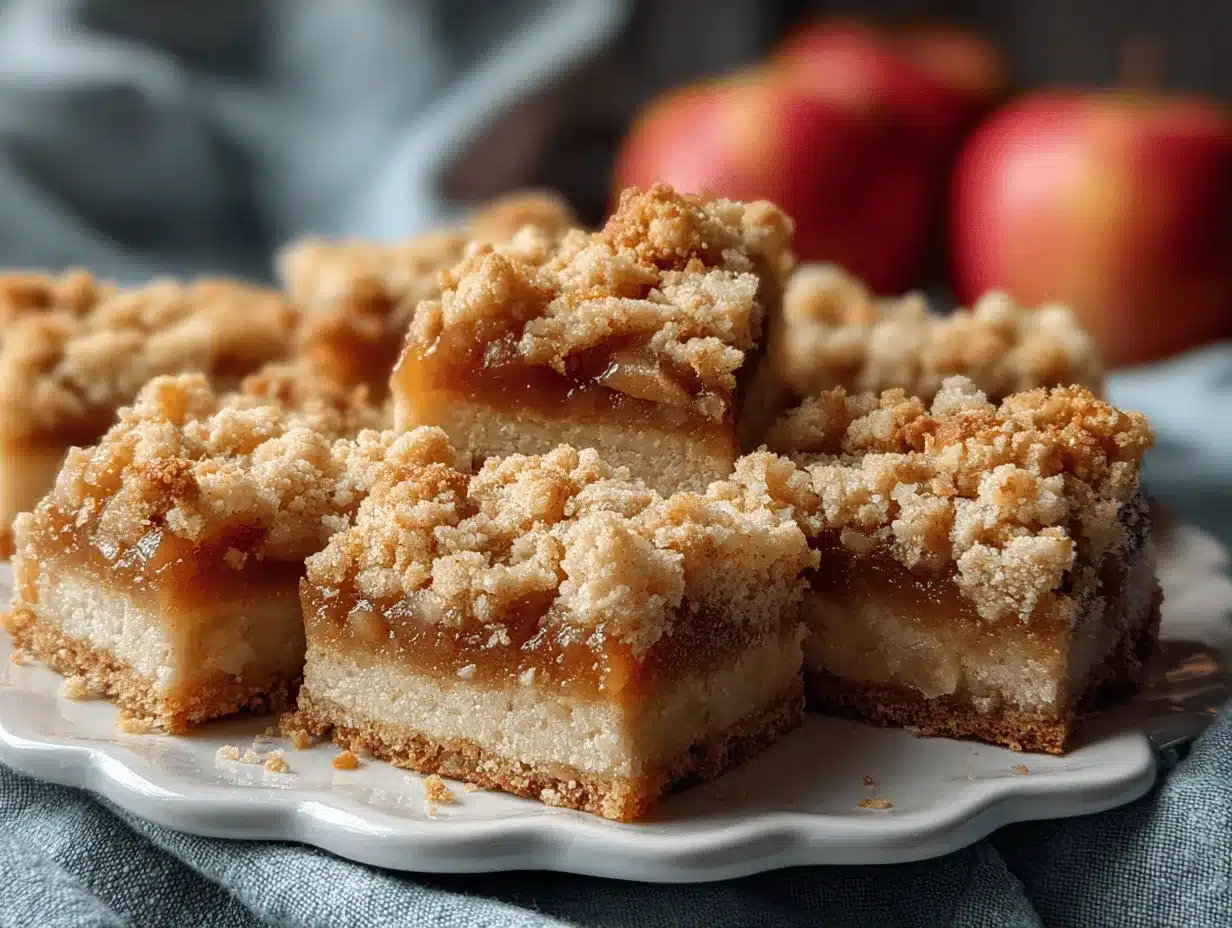
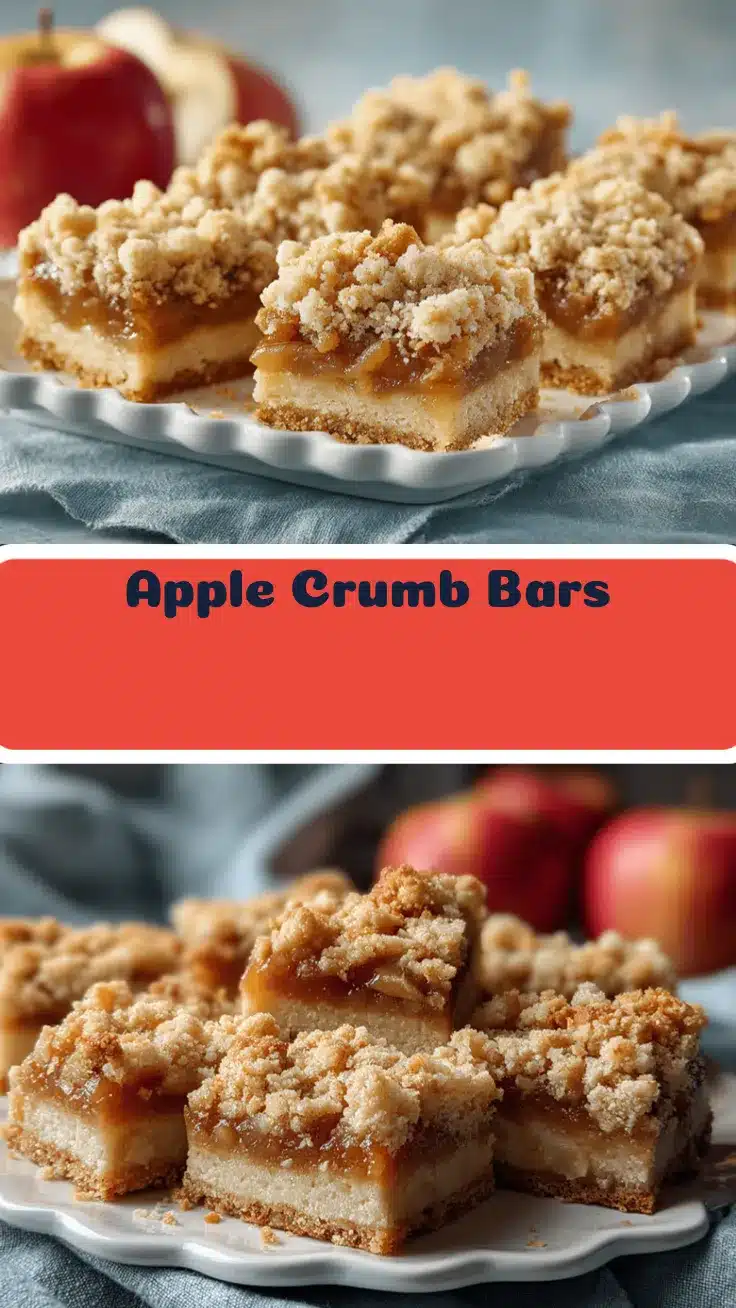
The sweet aroma of cinnamon-spiced apples bubbling beneath a golden, buttery crumb topping—now that’s the smell that pulls everyone to the kitchen. I still remember the first time I made apple crumb bars: it was a chilly October afternoon, and honestly, I was craving something that screamed “fall” but didn’t require peeling a mountain of apples for pie. These bars came to life with a simple idea—why not sandwich tender apples between layers of oat-packed crust and crumb?
It’s funny, but apple desserts always remind me of my grandma’s house. She used to make apple crisp with whatever apples happened to be on hand—sometimes tart, sometimes sweet, always delicious. That’s the spirit behind these apple crumb bars: use what you have, keep it unfussy, and let those cozy flavors shine. There’s something magical about the way apples transform when baked—soft, jammy, and perfectly tangy. And when you pair that with a slightly salty, crunchy crumb? Oh, you know it’s going to be good.
This apple crumb bars recipe is my go-to for fall gatherings, after-school snacks, or when I just want to curl up with a treat and a mug of tea. I’ve tested it more times than I can count—tweaking the spice blend, swapping in different apples, and even playing around with the base (trust me, a little almond flour works wonders). The best part? You don’t need fancy equipment or a pastry chef’s touch—just a few pantry staples and a little patience while your kitchen fills with that irresistible scent.
Whether you’re baking for your family or your own late-night cravings, these apple crumb bars deliver all the flavor of a classic apple pie, minus the fuss. Let’s face it, when autumn rolls around, you want something easy, comforting, and totally shareable. So grab your apples and let’s bake some memories—this recipe’s got your back!
Why You’ll Love This Apple Crumb Bars Recipe
I’ve baked my way through countless apple desserts, but these apple crumb bars have a special place in my heart (and stomach). They’re not too sweet, they’re perfectly spiced, and that crumb topping? It’s the stuff of dreams. Here’s why you’ll love making—and eating—these bars:
- Quick & Easy: These bars come together in under an hour, so you can whip them up even on busy days.
- Simple Ingredients: No need for a trip to a gourmet grocery—most ingredients are basic pantry staples.
- Perfect for Any Occasion: Great for cozy brunches, potlucks, holiday gatherings, or just a quiet night in.
- Crowd-Pleaser: Kids, adults, and even picky eaters rave about these crumb bars. (I’ve seen more than one person sneak back for seconds.)
- Unbelievably Delicious: The layers of spiced apple and buttery crumb are pure comfort food. Each bite is a little hug from fall.
What sets this apple crumb bars recipe apart? For starters, the crust and crumb are made from the same base, but with a simple tweak in the method—no need to fuss with separate doughs. I blend rolled oats into the crust for a chewy texture and toss in a pinch of salt to balance the sweetness. The apple filling is jammy but not mushy, thanks to a quick pre-cook on the stove (learned that one after a few soggy batches!).
Emotionally, these bars hit all the right notes: comfort, nostalgia, and just a touch of autumn magic. They’re the kind of treat you bake when you want to cozy up with a good book or impress friends at a get-together. In my experience, people love the homemade vibe—there’s nothing store-bought about these. Plus, you can tweak the recipe to suit your mood (swap in pears, add pecans, or drizzle with caramel). It’s flexible, forgiving, and always delicious.
Honestly, if you’re looking for an easy apple dessert that delivers big flavor and a perfect crumbly top, this is it. Trust me—I’ve made these bars more times than I can count, and every time, they disappear faster than you’d expect!
Ingredients Needed for Apple Crumb Bars
This recipe uses simple, wholesome ingredients to deliver bold flavor and satisfying texture without the fuss. Most of these are pantry staples, and you can easily swap out a few things based on what you have. Here’s what you’ll need:
- For the Crust & Crumb:
- 2 cups (240g) all-purpose flour (or use half whole wheat for a nuttier flavor)
- 1 cup (100g) rolled oats (old-fashioned oats work best for chunky texture)
- 3/4 cup (150g) light brown sugar, packed
- 1/2 teaspoon salt
- 1 teaspoon ground cinnamon
- 1/2 teaspoon baking powder
- 1 cup (226g) unsalted butter, cold and cut into cubes (adds richness)
- 1 teaspoon vanilla extract
- For the Apple Filling:
- 3 1/2 cups (about 4 medium, 500g) apples, peeled, cored, and diced (Granny Smith for tartness, Honeycrisp for sweetness—use your favorite!)
- 2 tablespoons (30g) granulated sugar (adjust to taste based on apple variety)
- 1 tablespoon (8g) all-purpose flour (helps thicken the filling)
- 1/2 teaspoon ground cinnamon
- 1/8 teaspoon ground nutmeg (optional, but adds cozy warmth)
- 2 teaspoons lemon juice (brightens up the flavors)
- Optional Topping:
- 1/4 cup (30g) chopped walnuts or pecans (for extra crunch)
- Powdered sugar, for dusting
- Caramel sauce, for drizzling
Ingredient Tips & Substitutions:
- Oats: Quick oats can work, but you’ll lose some texture.
- Butter: Swap for vegan butter if you’re dairy-free. Coconut oil (solid) also works, though the flavor changes a bit.
- Flour: Almond flour can replace up to half for a gluten-friendly version (the bars will be softer).
- Apples: Try mixing varieties for more depth—tart and sweet together is magic.
- Nuts: Skip if you’re nut-free, or add sunflower seeds for crunch.
- My go-to brands: King Arthur flour, Bob’s Red Mill oats, Kerrygold butter—they consistently bake up with great texture.
Honestly, don’t stress if you’re missing one spice or want to swap nuts for seeds. The recipe is forgiving, and every batch tastes a little different (in a good way!).
Equipment Needed
- 8×8-inch (20x20cm) Baking Pan: Square pan gives perfect, thick bars. You can use a 9×9-inch pan for thinner bars, just watch the baking time.
- Parchment Paper: For easy removal and less mess. Honestly, this is a game changer—less stuck-on crumb, more pretty slices.
- Mixing Bowls: Two medium bowls for crust/crumb and apples.
- Pastry Cutter or Fork: For cutting butter into the flour mixture. If you don’t have a pastry cutter, cold fingers work just fine!
- Spatula: For spreading layers evenly.
- Measuring Cups & Spoons: Accuracy matters for the crumbly texture.
- Small Saucepan: Optional, for pre-cooking the apples.
If you don’t have an 8×8-inch pan, you can split the recipe into two loaf pans or use a round cake pan—just keep an eye on the baking time. I’ve baked these bars in glass, ceramic, and metal pans; metal tends to crisp up the edges best. For maintenance, I always wash my pans by hand to keep the finish intact, and parchment paper keeps things easy.
Budget-wise, you don’t need anything fancy. Most tools are standard kitchen fare. If you’re starting out, invest in sturdy pans and decent measuring cups—they’ll last for years and make baking way less stressful.
Preparation Method
- Prep your pan: Line an 8×8-inch (20x20cm) baking pan with parchment paper, leaving a slight overhang for easy lifting. (This prevents sticking and helps you get neat bars.)
- Make the crust/crumb mixture: In a medium bowl, combine 2 cups (240g) flour, 1 cup (100g) rolled oats, 3/4 cup (150g) brown sugar, 1/2 teaspoon salt, 1 teaspoon cinnamon, and 1/2 teaspoon baking powder. Stir to blend. Add 1 cup (226g) cold, cubed butter and 1 teaspoon vanilla extract. Cut in the butter with a pastry cutter or fork until the mixture looks like chunky, damp sand—some pea-sized bits of butter are good for texture. Tip: If it’s too dry, add 1-2 tablespoons cold water, but don’t overmix.
- Press the crust: Take about 2/3 of the crumb mixture and firmly press it into the bottom of the prepared pan. Use a spatula or the flat side of a measuring cup to smooth it out. The base should be even and compact (otherwise, the bars will crumble apart).
- Prepare the apple filling: In a small bowl, toss 3 1/2 cups (500g) diced apples with 2 tablespoons (30g) sugar, 1 tablespoon (8g) flour, 1/2 teaspoon cinnamon, 1/8 teaspoon nutmeg (if using), and 2 teaspoons lemon juice. Optional: For extra jammy apples, cook them in a small saucepan over medium heat for 5 minutes, stirring often, until just softened and syrupy. (This step prevents excess moisture and soggy bars—learned the hard way after a few mushy batches!)
- Layer the apples: Spread the apple mixture evenly over the pressed crust. Try to get them all the way to the edges for even flavor in every bite.
- Add the crumb topping: Scatter the remaining crumb mixture over the apples. Don’t press it down—just let it sit in craggy clumps. (Those uneven bits crisp up perfectly!) If you’re adding nuts, sprinkle them on now.
- Bake: Bake at 350°F (175°C) for 35-40 minutes, or until the crumb is golden and the apples are bubbling at the edges. Note: If the top browns too quickly, loosely tent with foil after 25 minutes.
- Cool: Let the bars cool in the pan for at least 30 minutes. Then lift them out using the parchment paper overhang. Tip: Chilling for another hour makes slicing easier and gives clean edges.
- Serve: Slice into 12 bars. Dust with powdered sugar or drizzle with caramel if desired.
Troubleshooting: If your crumb topping looks dry, it’s probably under-mixed or missing a bit of butter—add a touch more to moisten. If the bars seem too wet, the apples may have released extra juice; precooking helps reduce this. For perfectly neat slices, use a sharp knife and wipe between cuts.
Honestly, don’t stress if the bars look rustic—those craggy tops are part of the charm. And if you’re short on time, you can skip the pre-cook on the apples, but expect a softer filling. Baking is about having fun, so enjoy every step!
Cooking Tips & Techniques
Let me share a few tricks I’ve learned after baking way too many apple crumb bars (and cleaning up a few kitchen disasters along the way):
- Cold butter is key: Always start with chilled butter for the crumb mixture. Warm butter makes the crust greasy and dense. Sometimes I even pop my flour and oats in the freezer for 10 minutes beforehand—call me obsessive, but it works.
- Don’t overmix the crumb: Stop once the mixture is sandy with pea-sized bits of butter. Overmixing leads to a tough base—trust me, I’ve baked a few hockey pucks.
- Precook the apples for best texture: If your apples are extra juicy (Honeycrisp, I’m looking at you), a quick sauté helps prevent soggy bars. I used to think this was an unnecessary step until my first batch fell apart from too much moisture.
- Use parchment paper every time: It means you can lift the bars out in one piece. (Once, I tried to skip it and spent 10 minutes prying bars out of the pan. Never again!)
- Test for doneness: Bars are ready when the crumb is golden and the filling bubbles around the edges. If the top browns before the apples cook, tent loosely with foil.
- Multitasking makes it easier: While the apples cook, prep your crumb mixture. I set up a mini assembly line—less chaos, more fun.
- Consistency is all about ratios: If you change up the flour or add nuts, make sure to compensate with a little extra butter or a dash of milk. The mixture should stick together when squeezed but not feel oily.
Honestly, the best advice is not to worry about perfection. Even “ugly” bars taste amazing. Each time you make them, you’ll find little tweaks—maybe a bit more spice, or a firmer crust. That’s the joy of baking at home!
Variations & Adaptations
Apple crumb bars are endlessly customizable. Here are three tried-and-true ways to switch things up, plus a few tips for making them work for everyone:
- Gluten-Free Variation: Swap all-purpose flour for a 1:1 gluten-free blend and use certified gluten-free oats. The bars will be a little softer, but the flavor’s still spot-on.
- Seasonal Twist: Mix diced pears or cranberries with the apples for a wintery vibe. I love adding a handful of fresh cranberries in December—tart, colorful, and festive.
- Flavor Boost: Add 1/4 cup (60g) caramel chips or butterscotch chips to the crumb mixture for a decadent, gooey bar. My kids go wild for this version!
- Dairy-Free Option: Use vegan butter or coconut oil instead of regular butter. The crumb stays crisp, and you can barely taste the difference.
- Nut-Free Adaptation: Skip nuts entirely, or add sunflower or pumpkin seeds for crunch.
- Personal Favorite: Last fall, I swapped half the apples for diced peaches and threw a pinch of cardamom into the crumb. The bars tasted like summer-meets-fall in every bite—so dreamy!
You can also bake these bars in muffin tins for individual servings, or double the recipe for a crowd in a 9×13-inch pan (just increase baking time to 45-50 minutes). If you’re watching sugar, reduce the brown sugar by 1/4 cup—apples are sweet enough.
Don’t be afraid to experiment. The base recipe is sturdy, so it can handle whatever mix-ins or swaps you throw at it. That’s half the fun!
Serving & Storage Suggestions
For serving, I always let the apple crumb bars cool completely—warm bars are delicious but tend to fall apart (learned that the messy way). Slice into squares and serve at room temperature. If you want to get fancy, dust with powdered sugar or drizzle with caramel sauce.
These bars pair perfectly with a scoop of vanilla ice cream or a dollop of whipped cream. For drinks, hot apple cider or a chai latte turns snack time into an autumn celebration.
Storage: Store leftover bars in an airtight container in the fridge for up to 4 days. The crumb stays crisp, and the flavors develop overnight—sometimes they taste even better on day two. To freeze, wrap individual bars tightly in plastic wrap and stash them in a freezer bag; thaw overnight in the fridge or gently reheat in the oven at 300°F (150°C) for 10 minutes.
For quick reheating, pop a slice in the microwave for 10-15 seconds (just enough to bring back the warm, gooey apple filling). If you’re planning to serve them at a party, assemble the bars a day ahead and slice just before guests arrive—easy, stress-free, and totally delicious.
Nutritional Information & Benefits
Each apple crumb bar (based on a batch of 12) contains roughly:
- Calories: 210
- Carbohydrates: 31g
- Fat: 9g
- Protein: 2g
- Fiber: 2g
- Sugar: 18g
Apples bring Vitamin C, fiber, and natural sweetness, while oats add heart-healthy whole grains. The recipe can be made gluten-free or dairy-free with simple swaps. Nuts add healthy fats and extra crunch, though you can leave them out for a nut-free version.
If you’re watching allergens, remember to check your oats and flour brands for cross-contamination. My personal wellness tip: these bars satisfy a sweet craving without the heaviness of pie, and the oats keep you full longer. Plus, homemade means you can control the sugar—always a win for me.
Conclusion: Apple Crumb Bars – Your New Fall Favorite
To sum it up, these irresistible apple crumb bars are the ultimate fall dessert—full of cozy flavors, easy to make, and perfect for sharing. Whether you’re baking for a crowd or just treating yourself, the simple ingredients and forgiving method make this recipe a keeper.
I love that you can customize the bars to fit your cravings or dietary needs—swap in pears, go gluten-free, add nuts, or drizzle with caramel. No matter how you mix it up, the results are always delicious. Personally, this recipe has become a staple in my autumn routine; there’s something so comforting about the blend of apples and crumbly topping.
If you give these apple crumb bars a try, let me know in the comments how they turned out—or what creative twists you added! Pin, share, or bake a batch for your next fall gathering. I hope these bars bring a little warmth and sweetness to your season. Happy baking!
FAQs
Can I use canned apple pie filling instead of fresh apples?
You can, but fresh apples give a better texture and flavor. If using canned, reduce the sugar in the filling and skip the precooking step.
What are the best apples for apple crumb bars?
Granny Smith for tartness and Honeycrisp for sweetness are my favorites. Mixing varieties gives the best flavor balance.
How do I make these bars gluten-free?
Use a gluten-free flour blend and certified gluten-free oats. The bars will be a little softer, but still delicious.
Can I freeze apple crumb bars?
Absolutely! Wrap individual bars tightly and freeze for up to 2 months. Thaw overnight in the fridge or reheat in the oven.
Why is my crumb topping dry or powdery?
It likely needs a bit more butter. Try adding 1-2 tablespoons cold butter and mix until chunky and damp-sandy. This gives the perfect crumbly texture!
Pin This Recipe!

Apple Crumb Bars Recipe – Easy Homemade Fall Dessert Bars
- Total Time: 1 hour
- Yield: 12 bars 1x
Description
These apple crumb bars feature tender, cinnamon-spiced apples sandwiched between layers of buttery oat-packed crust and crumb. They’re easy to make, customizable, and deliver all the cozy flavors of fall in a shareable dessert bar.
Ingredients
- 2 cups all-purpose flour (or use half whole wheat for nuttier flavor)
- 1 cup rolled oats (old-fashioned oats preferred)
- 3/4 cup light brown sugar, packed
- 1/2 teaspoon salt
- 1 teaspoon ground cinnamon
- 1/2 teaspoon baking powder
- 1 cup unsalted butter, cold and cut into cubes
- 1 teaspoon vanilla extract
- 3 1/2 cups apples, peeled, cored, and diced (about 4 medium apples, Granny Smith or Honeycrisp recommended)
- 2 tablespoons granulated sugar
- 1 tablespoon all-purpose flour
- 1/2 teaspoon ground cinnamon
- 1/8 teaspoon ground nutmeg (optional)
- 2 teaspoons lemon juice
- 1/4 cup chopped walnuts or pecans (optional, for topping)
- Powdered sugar, for dusting (optional)
- Caramel sauce, for drizzling (optional)
Instructions
- Preheat oven to 350°F (175°C). Line an 8×8-inch baking pan with parchment paper, leaving an overhang for easy lifting.
- In a medium bowl, combine flour, oats, brown sugar, salt, cinnamon, and baking powder. Stir to blend.
- Add cold, cubed butter and vanilla extract. Cut in the butter with a pastry cutter or fork until the mixture resembles chunky, damp sand with pea-sized bits of butter. If too dry, add 1-2 tablespoons cold water.
- Press about 2/3 of the crumb mixture firmly into the bottom of the prepared pan to form an even base.
- In a small bowl, toss diced apples with granulated sugar, flour, cinnamon, nutmeg (if using), and lemon juice. For a jammy filling, cook apples in a small saucepan over medium heat for 5 minutes until just softened and syrupy.
- Spread the apple mixture evenly over the pressed crust.
- Scatter the remaining crumb mixture over the apples in craggy clumps. Sprinkle nuts on top if using.
- Bake for 35-40 minutes, or until the crumb is golden and apples are bubbling at the edges. If the top browns too quickly, tent loosely with foil after 25 minutes.
- Let bars cool in the pan for at least 30 minutes. Lift out using parchment overhang. For cleaner slices, chill for another hour.
- Slice into 12 bars. Dust with powdered sugar or drizzle with caramel if desired.
Notes
For best texture, use cold butter and avoid overmixing the crumb. Precooking apples helps prevent soggy bars, especially with juicy varieties. The recipe is flexible—swap in pears, cranberries, or nuts as desired. For gluten-free, use a 1:1 gluten-free flour blend and certified gluten-free oats. Bars slice best when fully cooled or chilled.
- Prep Time: 20 minutes
- Cook Time: 40 minutes
- Category: Dessert
- Cuisine: American
Nutrition
- Serving Size: 1 bar (1/12 of recipe)
- Calories: 210
- Sugar: 18
- Sodium: 90
- Fat: 9
- Saturated Fat: 5
- Carbohydrates: 31
- Fiber: 2
- Protein: 2
Keywords: apple crumb bars, fall dessert, apple bars, easy apple dessert, oat crumb bars, homemade apple bars, autumn baking, apple recipes, dessert bars, comfort food