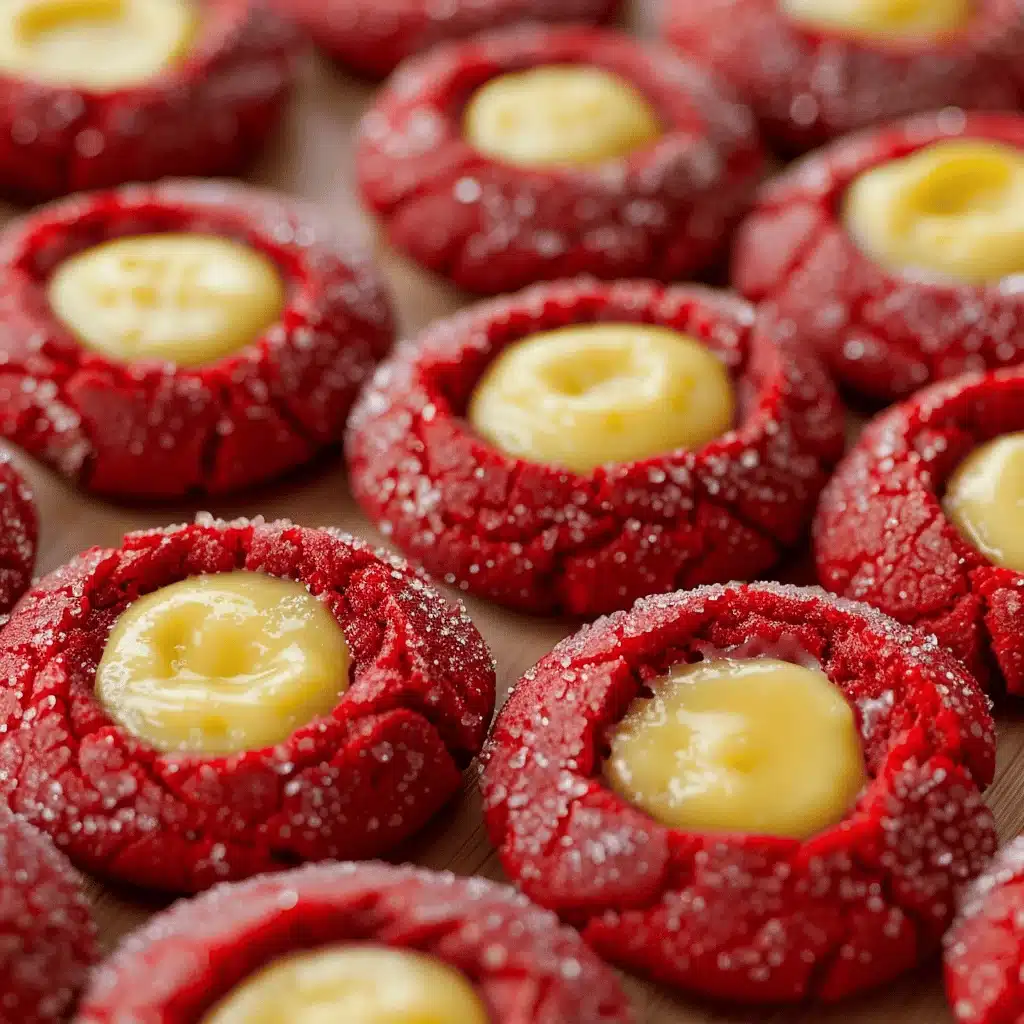
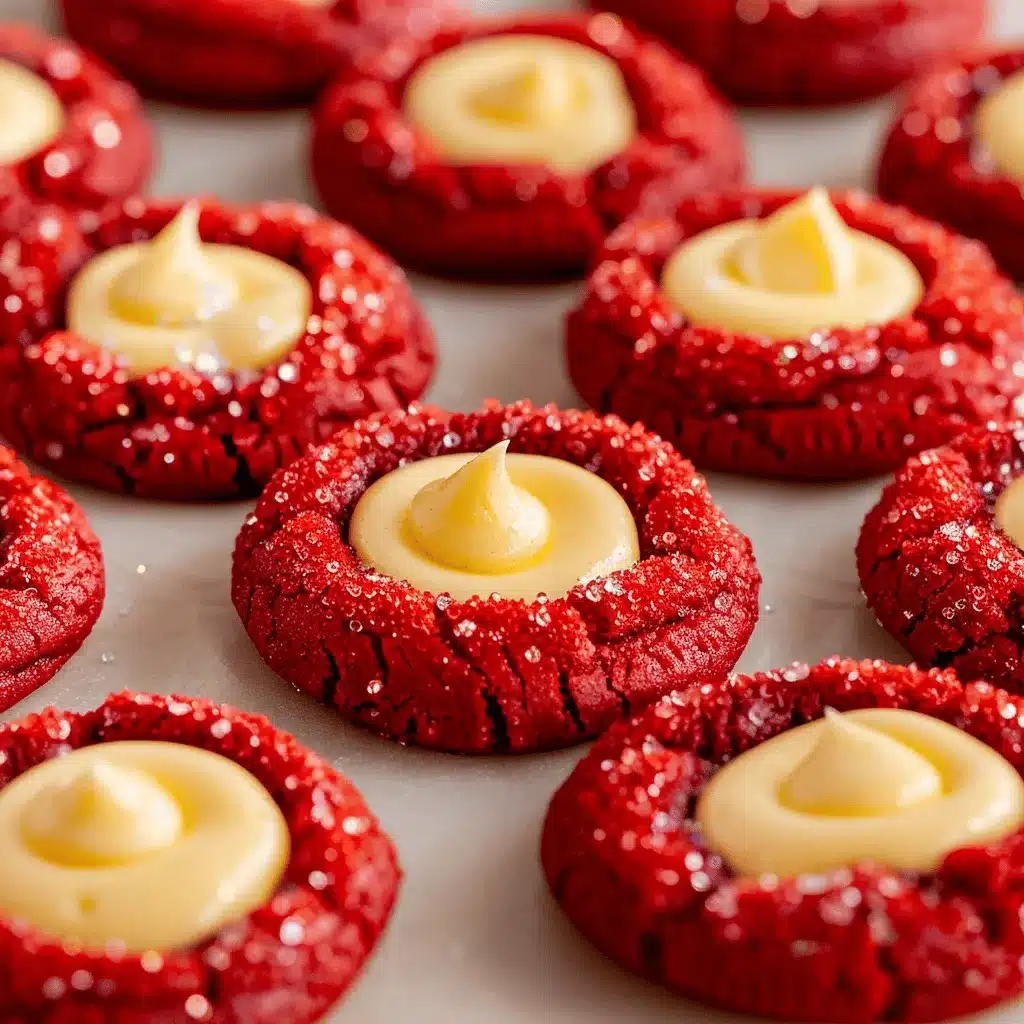
The first time I made red velvet cheesecake thumbprint cookies, my kitchen was filled with the most incredible aroma. You know that sweet, buttery scent mixed with a hint of cocoa? It takes you straight back to childhood baking days! I stumbled upon this recipe while searching for something unique to bring to a friend’s holiday party, and let me tell you, it was a hit! These cookies are not just visually stunning with their vibrant red color and cream cheese filling, but they also pack a delicious punch that keeps people coming back for more.
Honestly, there’s something about the combination of soft, chewy cookie and creamy cheesecake that feels like a warm hug. It’s perfect for special occasions or simply to treat yourself after a long day. Plus, they’re surprisingly easy to whip up, making them a great choice for busy bakers or anyone looking to impress without spending hours in the kitchen. Whether you’re catering to a crowd or indulging solo, these amazing red velvet cheesecake thumbprint cookies are worth every minute spent in the kitchen!
So grab your apron, and let’s dive into this delightful recipe that’s sure to become a new favorite. Trust me, you’ll want to make these again and again!
Why You’ll Love This Recipe
There are plenty of reasons to love these amazing red velvet cheesecake thumbprint cookies. Here’s why they stand out:
- Quick & Easy: This recipe comes together in just five simple steps, making it perfect for last-minute baking.
- Stunning Presentation: The vibrant red color and creamy white filling make these cookies an eye-catching treat that’s perfect for any occasion.
- Crowd-Pleaser: Whether at a party or a family gathering, these cookies are sure to impress kids and adults alike.
- Deliciously Decadent: The combination of red velvet and cheesecake is simply irresistible. It’s a flavor experience that will leave you wanting more!
- Flexibility: You can easily adapt this recipe to create different flavors by using various fillings or toppings.
What makes these cookies different from the rest? It’s the texture! The soft, chewy cookie contrasts beautifully with the rich, creamy cheesecake filling. When you take a bite, the flavors meld together in a way that feels indulgent yet comforting. And let’s not forget the joy of making thumbprint cookies—they’re just plain fun! So grab your ingredients and let’s get started on these delightful treats that are bound to become a staple in your baking repertoire.
Ingredients Needed
This recipe uses simple, wholesome ingredients to create those delicious red velvet cheesecake thumbprint cookies. You likely have most of them already in your kitchen!
- For the Cookie Base:
- 2 ½ cups all-purpose flour (sifted)
- 1 cup unsalted butter, softened
- 1 cup granulated sugar
- 1 large egg, room temperature
- 1 tablespoon red food coloring
- 1 tablespoon cocoa powder (unsweetened)
- 1 teaspoon vanilla extract
- ½ teaspoon baking powder
- ½ teaspoon salt
- For the Cheesecake Filling:
- 8 oz cream cheese, softened
- ½ cup powdered sugar
- 1 teaspoon vanilla extract
- 1 large egg yolk
Now, I always recommend using high-quality ingredients for the best flavor. For the cream cheese, brands like Philadelphia are reliable for that perfect creamy texture. And when it comes to the food coloring, gel-based options give you a vibrant hue without altering the consistency of your dough. Remember, fresh ingredients = better results!
Equipment Needed
Before you start baking these amazing red velvet cheesecake thumbprint cookies, let’s gather the essential tools:
- Mixing bowls (medium and large)
- Electric mixer (hand or stand)
- Measuring cups and spoons
- Baking sheet lined with parchment paper
- Cookie scoop or tablespoon (for portioning dough)
- Wooden spoon or spatula
- Oven thermometer (optional, but helpful for precise baking)
If you don’t have a cookie scoop, don’t worry! A regular tablespoon will do just fine. And remember, keeping your baking sheet lined with parchment paper not only helps with easy clean-up but also ensures your cookies bake evenly.
Preparation Method
- Preheat Your Oven: Preheat your oven to 350°F (175°C). This step is crucial for getting those cookies to bake properly!
- Prepare the Cookie Dough: In a large mixing bowl, cream together the softened butter and granulated sugar until light and fluffy. This should take about 2-3 minutes. Add the egg, food coloring, vanilla, and cocoa powder. Mix until combined.
- Add Dry Ingredients: Gradually add the sifted flour, baking powder, and salt to the wet mixture. Mix until just combined. You don’t want to overmix; a few lumps are okay!
- Chill the Dough: Cover the dough and refrigerate for about 30 minutes. Chilling helps the cookies hold their shape while baking.
- Make the Cheesecake Filling: While the dough is chilling, prepare your cheesecake filling. In a separate bowl, beat the cream cheese until smooth. Add powdered sugar, vanilla extract, and egg yolk. Mix until creamy and well combined.
- Shape the Cookies: Once the dough is chilled, scoop out about a tablespoon of dough and roll it into a ball. Place it on the lined baking sheet. Use your thumb (or the back of a spoon) to make an indention in the center of each cookie.
- Fill the Cookies: Spoon the cheesecake filling into the thumbprint of each cookie, being careful not to overfill.
- Bake: Bake the cookies in your preheated oven for 12-15 minutes, or until the edges are set. The centers may look a little soft, but they will firm up as they cool.
- Cool and Serve: Allow the cookies to cool on the baking sheet for 5 minutes before transferring them to a wire rack to cool completely. Enjoy your amazing red velvet cheesecake thumbprint cookies!
As you bake, the kitchen will fill with a sweet, inviting aroma that’s hard to resist. Just remember to keep an eye on the cookies during the last few minutes of baking to avoid over-baking!
Cooking Tips & Techniques
To ensure the best results with your amazing red velvet cheesecake thumbprint cookies, keep these tips in mind:
- Room Temperature Ingredients: Make sure your butter and cream cheese are at room temperature for a smoother batter.
- Don’t Skip Chilling: Chilling the dough is vital for maintaining the shape of the cookies while baking. It also helps develop the flavors!
- Watch the Baking Time: Every oven is different. Start checking the cookies a minute or two before the suggested baking time.
- Perfecting the Thumbprint: If your thumbprint doesn’t hold its shape, simply press again once the cookies are out of the oven.
- Store Properly: Keep these cookies in an airtight container to maintain their freshness. They can last up to a week at room temperature!
Honestly, I’ve made these cookies a few times now, and I’ve learned that patience is key. Don’t rush through the chilling or baking process, and you’ll be rewarded with perfectly chewy cookies every time!
Variations & Adaptations
The beauty of these amazing red velvet cheesecake thumbprint cookies is their versatility. Here are some fun variations to try:
- Chocolate Chip Twist: Add a handful of mini chocolate chips to the cookie dough for a delightful chocolate surprise.
- Seasonal Flavors: Swap the cheesecake filling for pumpkin or peppermint filling during the fall and winter months for a festive touch.
- Gluten-Free Option: Use a gluten-free 1:1 baking flour to make these cookies gluten-free without sacrificing flavor!
Feel free to get creative with your toppings too! A drizzle of white chocolate or a sprinkle of crushed nuts can take these cookies to the next level.
Serving & Storage Suggestions
These amazing red velvet cheesecake thumbprint cookies are best served fresh but can be enjoyed over several days. Here are some serving tips:
- Serve at room temperature for the best flavor and texture.
- Pair these cookies with a glass of milk, a cup of coffee, or even a scoop of vanilla ice cream for an indulgent dessert.
- Store leftovers in an airtight container at room temperature for up to a week, or in the fridge for longer freshness.
- To freeze, place them in a single layer on a baking sheet to firm up before transferring to a freezer-safe container. They can be frozen for up to 3 months.
As the cookies sit, the flavors will develop, making them even more delightful to eat after a day or two!
Nutritional Information & Benefits
These cookies not only taste amazing but also have a few nutritional perks, especially when made with quality ingredients:
- Each cookie contains approximately 150 calories, with a balance of carbohydrates, fats, and proteins.
- The cream cheese adds a dose of calcium and protein, while the cocoa powder provides antioxidants.
- Feel free to adjust the sugar levels for a lighter version, or substitute with healthier alternatives!
As always, keep in mind any dietary restrictions, especially with cream cheese. There are excellent dairy-free options available now if needed!
Conclusion
These amazing red velvet cheesecake thumbprint cookies are not just a treat; they’re an experience! With their stunning appearance and delightful flavors, they’re sure to make any occasion special. I love how simple yet impressive they are, making them a go-to recipe in my collection. So, whether you’re baking for a crowd or treating yourself, don’t hesitate to whip up a batch!
Remember, cooking is all about creativity, so feel free to customize this recipe to fit your taste. I’d love to hear how your cookies turn out—leave a comment below, share your adaptations, and let’s spread the love for these delicious treats!
Happy baking!
FAQs
- Can I make these cookies ahead of time?
Yes! You can prepare the dough and refrigerate it for up to 3 days before baking. - Can I freeze these cookies?
Absolutely! Freeze them in an airtight container for up to 3 months. - What if I don’t have red food coloring?
You can use beet juice for a natural alternative, but it may alter the color slightly. - Can I use a different filling?
Yes! Feel free to switch the cheesecake filling with your favorite flavors like lemon or cookie butter! - How do I store leftover cookies?
Store them in an airtight container at room temperature for up to a week or in the fridge for longer freshness.
Pin This Recipe!


Amazing Red Velvet Cheesecake Thumbprint Cookies
- Total Time: 45 minutes
- Yield: 24 cookies 1x
Description
These cookies are visually stunning with their vibrant red color and cream cheese filling, and they pack a delicious punch that keeps people coming back for more.
Ingredients
- 2 ½ cups all-purpose flour (sifted)
- 1 cup unsalted butter, softened
- 1 cup granulated sugar
- 1 large egg, room temperature
- 1 tablespoon red food coloring
- 1 tablespoon cocoa powder (unsweetened)
- 1 teaspoon vanilla extract
- ½ teaspoon baking powder
- ½ teaspoon salt
- 8 oz cream cheese, softened
- ½ cup powdered sugar
- 1 teaspoon vanilla extract
- 1 large egg yolk
Instructions
- Preheat your oven to 350°F (175°C).
- In a large mixing bowl, cream together the softened butter and granulated sugar until light and fluffy.
- Add the egg, food coloring, vanilla, and cocoa powder. Mix until combined.
- Gradually add the sifted flour, baking powder, and salt to the wet mixture. Mix until just combined.
- Cover the dough and refrigerate for about 30 minutes.
- In a separate bowl, beat the cream cheese until smooth. Add powdered sugar, vanilla extract, and egg yolk. Mix until creamy and well combined.
- Once the dough is chilled, scoop out about a tablespoon of dough and roll it into a ball. Place it on the lined baking sheet.
- Use your thumb (or the back of a spoon) to make an indention in the center of each cookie.
- Spoon the cheesecake filling into the thumbprint of each cookie, being careful not to overfill.
- Bake the cookies in your preheated oven for 12-15 minutes, or until the edges are set.
- Allow the cookies to cool on the baking sheet for 5 minutes before transferring them to a wire rack to cool completely.
Notes
Use high-quality ingredients for the best flavor. Chilling the dough is vital for maintaining the shape of the cookies while baking.
- Prep Time: 15 minutes
- Cook Time: 15 minutes
- Category: Dessert
- Cuisine: American
Nutrition
- Serving Size: 1 cookie
- Calories: 150
- Sugar: 10
- Sodium: 100
- Fat: 8
- Saturated Fat: 5
- Carbohydrates: 18
- Protein: 2
Keywords: red velvet, cheesecake, cookies, thumbprint, dessert